Affordable Audio/Video Gear Reviews
People sometimes ask me, "What kind of camera do you use?" For those who might need some audio/video gear, all of the introductory-level gear reviewed here strikes a balance between affordability and quality. I've used it all personally to make my Youtube videos. Each of the affiliate links* below will bring you to Amazon.com where you can see the most up-to-date listings.
Start with the Gear You Already Have
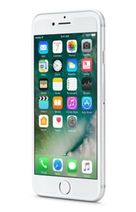
Most people in the USA have access to a phone. Each year, phone cameras get more advanced. Consider making some videos with your phone to practice and see how the quality comes out before buying new gear. Here are some quick tips to instantly making the most of your phone's video and audio. 1) Record during the day near a window to let in lots of light. 2) Use a tripod to steady the picture. 3) Turn the phone sideways to get the wide- angle view. 4) For better audio, (a) stand close enough so that you could touch the phone (but don't), (b) speak a little louder than normal so the phone's mic will pick you up well, and (c) keep the background noise to a minimum.
When I first started Youtube, my phone was terrible! If you have a high-end phone, however, give it a try.
When I first started Youtube, my phone was terrible! If you have a high-end phone, however, give it a try.
Canon T5i Camera Review: Highly Recommend
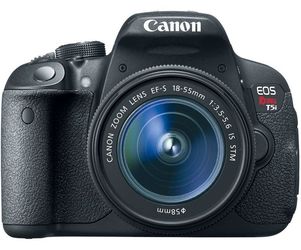
I've use the Canon T5i on almost every video I've made so far. (Click here to see its current listing on Amazon.) It's a common Youtube camera along with the newer T6i and T7i for good reason. It's affordable, easy to you, and takes GREAT video, better than most video cameras and phones. It's an excellent "starter" camera for photos but its video quality in about equal to much more expensive Canon cameras.
It's also easy to use and has a flip screen so you can see what the shot looks like when you're sitting in front of the camera. It has an external microphone jack so you can go directly into the camera with a mic and get that nice clear audio that will make you sound more professional (bad audio is a bummer).
My version is the T5i but the newer T6i and T7i are out there now and also really strong but a little bit more money. There's only one downside to this camera when used for video. It only takes up to 10 or 12 min. worth of video before it will end the file and start a new one. If you know most of your videos will be 15 min. or longer and you want one continuous shot with no edits, I recommend getting an actual video camera. However, the video on the T5i will be far better than most video cameras. The other downside, which is common to most cameras like this, is the inexpensive "kit" lens that comes with it is just average. It will look Okay and you should practice with it before buying another lens. In the long run, however, investing in a $100 to $150 24 mm, 35mm, or 50mm fixed lens will make the videos look much more professional.
50mm Canon Lens (EF 50mm f/1.8 STM): Highly Recommend
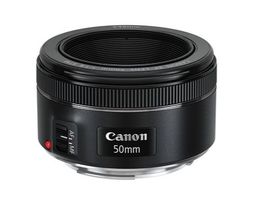
I use Canon's 50mm fixed lens for mainly video for three main reasons (See its current listing on Amazon here). First, it is extremely affordable. Second, it is excellent in low light. The "f/1.8" in the name of the lens signifies a low f-stop number. That means it works well even at night. I do use lighting for my videos but you can get by with natural daylight if you need to. In contrast, most other lenses with higher numbers for "f-stop" will usually require extra lighting to make videos look good. Third, this lens will help give you a nice blurry background (i.e., bokeh). You have to play with the settings on your camera to get that look but this lens is an excellent choice if you want to look in focus but have the stuff behind you out of focus. It's a really professional look.
The one downside on this lens is that it is really zoomed in. It has narrow, fixed angle. You can't zoom in or zoom out manually. You can only control the focus. As a result, I have to stand about 6+ feet away to get my head, chest, and arms in the shot. If you're working in a tight space, you can really only use this lens for close up shots. There's a related issue if you want to get a blurry background. Your subject has be about 1/2 the distance between the camera and the background. If I'm standing 6 feet from my camera, the background behind me needs to be at least another 6 feet behind me and it only starts looking obviously blurry if the background is 8+ feet behind me. If you have some space to work, these won't be issues. If you have a tight space, I recommend Canon's 24mm lens. It has a wider angle and still can get somewhat of a blurry background effect.
The one downside on this lens is that it is really zoomed in. It has narrow, fixed angle. You can't zoom in or zoom out manually. You can only control the focus. As a result, I have to stand about 6+ feet away to get my head, chest, and arms in the shot. If you're working in a tight space, you can really only use this lens for close up shots. There's a related issue if you want to get a blurry background. Your subject has be about 1/2 the distance between the camera and the background. If I'm standing 6 feet from my camera, the background behind me needs to be at least another 6 feet behind me and it only starts looking obviously blurry if the background is 8+ feet behind me. If you have some space to work, these won't be issues. If you have a tight space, I recommend Canon's 24mm lens. It has a wider angle and still can get somewhat of a blurry background effect.
Canon 24 mm Lens (EF-S 24mm f/2.4 STM): Recommend
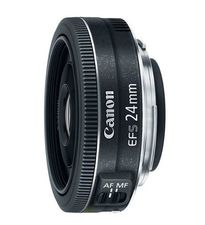
Canon's 24mm fixed lens is another great affordable option (See its current listing here on Amazon here). Its benefits include a nice wide angle. You can capture your entire upper body by standing just a few feet from it. Its 2.8 f-stop means that it will work well in low light. For these two reasons, it's a very handy Youtube lens for video. You can use it in even a small home office and it will make the space look somewhat bigger. Like the Canon 50mm lens, it is good at achieving that blurry background (i.e., bokeh). However, unlike the 50mm lens, your background has to be further back to get that look.
The downsides of this lens are really just related to its intended use. It looks great for wide angle and pretty close up situations. In contrast, it is fixed and isn't designed to zoom in. You can only control what you put in focus. Overall, it's a a great Youtube lens for video and great for close up photo.
I prefer my 50mm lens because it achieves the blurry background more easily and I have enough space to not worry about how zoomed in the 50mm looks.
Webcam: Logitech 920c: Recommended
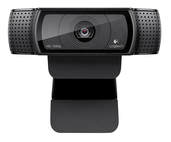
The logitech 920c is an excellent affordable option for a high definition webcam (See its current listing at Amazon here.). It is a common first choice for many Youtube creators, including me, because of its blend of quality and simplicity. It is true HD quality at 1080p, which is higher than most built-in webcams at 720p. It has a nice wide angle and is simple to use when compared to "real" cameras. You just have to make sure that you "select" this camera after plugging it in. Your computer will mostly likely keep using your built-in webcam unless you actively select that option. Each application (e.g., Skype, Quicktime, etc.) have slightly different instructions. You can Youtube or Google instructions for selecting the external webcam depending on how you're using it.
There are newer and more expensive versions on this camera out there (e.g., Logitech BRIO) but the 920c is an outstanding option for the price. A webcam is a great budget-friendly way to keep things simple and still get some pretty good quality.
The only downside is that the audio quality of the camera is really not much better than most standard computer microphones. You're really paying for the video quality.
Rode Smartlav+ Lavalier Microphone (with adaptor): Highly Recommend
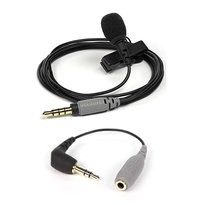
This Rode Smartlav+ lavalier microphone has a broadcast sound quality (See its current listing on Amazon here). I use it now almost exclusively when I'm "on camera." It's often been said that viewers will tolerate grainy video but will not tolerate poor audio. If you're considering purchasing a lavalier microphone (i.e., the kind you'd clip to your shirt), this one is an excellent choice. It has a nice well-rounded natural sound with very low noise. In other words, it has virtually no "hiss" and sounds crystal clear.
It has no downsides but I want to mention a few details about it's use. If you want to use it for a camera or audio recorder, you'll need the version with the adaptor. If you're going straight into a smartphone, you don't need the adaptor. Also, it is an omnidirectional mic. Like most lavalier mics, it will pick up some background noise in addition to your voice. I only use it when I know things will be relatively quiet. If you're going to be in a noisy environment, you may want to look into a unidirectional microphone that mainly picks up what is right in front of it. Those are harder to come by and seem to have an overall less well-rounded sound quality. That's why most people prefer the sound of omnidirectional microphones like this one if they can control the noise around them.
It has no downsides but I want to mention a few details about it's use. If you want to use it for a camera or audio recorder, you'll need the version with the adaptor. If you're going straight into a smartphone, you don't need the adaptor. Also, it is an omnidirectional mic. Like most lavalier mics, it will pick up some background noise in addition to your voice. I only use it when I know things will be relatively quiet. If you're going to be in a noisy environment, you may want to look into a unidirectional microphone that mainly picks up what is right in front of it. Those are harder to come by and seem to have an overall less well-rounded sound quality. That's why most people prefer the sound of omnidirectional microphones like this one if they can control the noise around them.
Blue Yeti USB Microphone: Highly Recommend
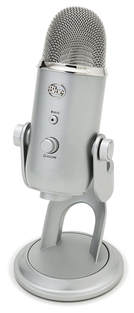
The Blue Yeti is a great USB desktop microphone with lots of benefits (See its current listing here on Amazon). I've used it for every voiceover video I've done for the past two years. Other less expensive USB mics just don't have its nice warm sound and mics that are much more expensive don't sound better to my ears.
The best part about using a USB mic is that you can record directly into your computer. You don't need any other recording gear. This microphone also has a gain control. That means you can crank it up so it picks up every little sound or turn it down so that it is less sensitive and picks up less sound from the environment. It also has a headphone jack so you can hear what you sound like in real time. It is essentially a plug-and-play mic.
BUT, there are a few details to consider about its use. To sound it's best, you will have to experiment with the 1) gain level on the microphone, and 2) your distance from the mic. For example, my voiceovers sound best when I'm about 4 inches from the microphone with the gain set at about 40%. I also use a pop filter to get ride of the harsh P and B sounds. I recommend asking a musician friend to get their opinion as you experiment with the mic. Musicians have good "ears" and will pick up on details of the sound that you may not (e.g., amount of noise, "clipping," proximity effect, etc.). Yes, technically this is a plug-and-play mic but you'll have to practice with it's various settings to the most out of it.
Tascam DR-05 Audio Recorder: Highly Recommend
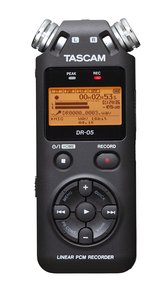
Great audio is often the beginning of great video (See its current Amazon listing here). You can plug your lavalier microphone directly into this recorder and get that crisp and clear sound. I have used this recorder for almost every single video I've made where I'm on camera.
It's strengths are numerous. It lets you control the input level. That will reduce the chances of your audio being too low or too high depending on your microphone. It also has a built in limited and peak control. I use the limiter, for example, to make sure that my audio is never going over around -12 dB. Most less expensive audio recorders do not let you control the input level and do not have the limiter and peak control.
A few details for its use. Because of its options, you have to read the manual and play with it a bit. If you have a powered mic, for instance, you have to engage that option on the recorder or the sound will have a hum. If you want to adjust the input level, peak, or limiter options, you have to do each of those manually. Once you practice it even once or twice, it will be easier to navigate. To get your audio from the recorder to your video editor, you'll can use the micro SD card or a cable.
Keep in mind, you can likely use your phone to record audio if it has the right input and application. You may want to experiment with whatever phone you have before purchasing an audio recorder. I prefer my audio recorder because I'm most comfortable working with SD cards but many phones record nice clean audio you can then sync with your video.
Budget Lighting: Recommend
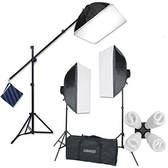
If you'll be doing your video indoors, I recommend getting some affordable lighting. You may want to first try opening the blinds and using natural daylight. Daylight looks great. You may also want to try putting some extra lamps about six feet away from you on the left and right aimed at you. If that is not enough, I use a very affordable lighting set up (See StudioFX Large Photography Softbox at Amazon). I use the kit pictured. There are many similar options on Amazon that are all about the same or lower prices.
The big upside to these kits is their affordability. They don't cost much but make everything look better. I have also found my kit to be very reliable and I've not lost a bulb yet in the past 2 years.
The downsides are that they are simply not portable. If you're going to keep the gear in one place, then these will work. Another downside is that they less expensive kits are large. They'll take up space in your room. If you're doing to be mobile and film in lots of different locations, then you'll likely want to invest in a smaller, more portable lighting set up.
* An Amazon affiliate link represents is a partnership between Amazon and the party referring readers or viewers to Amazon. Essentially, it does not cost customers more and Amazon pays a very small % for the referral that helps fund this website and associate Youtube channel.

